This guide provides step-by-step instructions for integrating Responsly with Salesforce Service Cloud to automatically send a customer satisfaction survey (CSAT, CES, or NPS) after a support case is closed. The integration uses Responsly’s native Salesforce connector to sync survey responses back into Salesforce records, enabling closed-loop feedback management directly within Service Cloud.
The automation relies on a Workflow Rule in Salesforce that fires when a Case status changes to “Closed,” triggering an email alert containing the Responsly survey.
Prerequisites
Before starting, ensure the following requirements are met:
- A Responsly account (with Salesforce integration available on your plan)
- A Salesforce CRM account — Sales Cloud or Service Cloud, Enterprise Edition or higher (required for API access)
- Administrator access in both Responsly and Salesforce
- Pop-ups enabled in your browser (required for the OAuth authorization flow)
Step 1: Create Your Post-Support Survey in Responsly
In this step you design the actual survey that will be sent after a case is closed. Keep it short and focused on the support interaction.
- Log in to your Responsly dashboard.
- Click Create new survey and choose how you want to start — use a template (e.g., Customer Satisfaction or Customer Effort Score), the AI survey generator, or build the survey from scratch.
- Remove the default Welcome page from the survey so that the first screen customers see is your CSAT / CES / NPS question. This keeps the flow short and works best when sending the survey via email.
- Add your questions. For high response rates, keep the survey to 1–3 key questions. In the Responsly builder this typically means:
- Q1 – one CSAT / CES / NPS rating question (Satisfaction Score, Rating, Numbers scale or NPS type)
- Q2 – one Text question for qualitative feedback (e.g., “What could we have done better?”)
- Q3 (optional) – an additional NPS or Rating question if you want to track more than one metric (e.g., relationship NPS vs. support CSAT)
- Choose the main metric you want to track for post-support feedback and pick the corresponding question type in Responsly (see the question picker in the builder):
- CSAT (Customer Satisfaction Score) – add a Satisfaction Score or Rating question (1–5 or similar scale) and ask “How satisfied were you with the support you received?”
- CES (Customer Effort Score) – add a Rating or Numbers scale question (e.g., 1–5 from “Very difficult” to “Very easy”) and ask “How easy was it to get your issue resolved?”
- NPS (Net Promoter Score) – add an NPS question (0–10 scale) and ask “How likely are you to recommend us after this support interaction?”
- Configure Skip Logic if needed – for example, only show the open-text follow-up when the CSAT score is below 4, so detractors are asked for more detail.
Tip: The survey will be sent via email from Salesforce, and each link will already include Salesforce merge tags that identify the Contact and Case. You do not need to add separate identification questions (like name or email) to this survey.
Step 2: Connect Responsly to Salesforce
Authorize the connection between Responsly and your Salesforce org.
- Open your survey in Responsly.
- Navigate to the Connect tab.
- Find Salesforce in the list of available integrations.
- Click the Connect button to begin the OAuth authorization flow.
- A pop-up window will appear — log in to your Salesforce account and authorize Responsly to access your org.
- Once authorized, Salesforce will be connected.
Pop-up blocked? Check your browser’s URL bar for a blocked pop-up notification. Enable pop-ups for
app.responsly.comin Chrome, Firefox, Edge, Opera, or Safari.
Step 3: Configure the Survey Link with Salesforce Merge Tags
Set up Salesforce merge tags (passed as URL parameters) so that each survey response is tied to the correct Salesforce Case and Contact.
- In the Salesforce integration settings, click the Survey link tab.
- At the top, you will see the public survey URL with parameters already appended. Below it, configure the merge tag rows:
- Row 1: Object =
Contact, Field =Email→ generates parametercontact_email - Row 2: Object =
Contact, Field =Contact ID→ generates parametercontact_id - Row 3: Object =
Case, Field =Case ID→ generates parametercase_id - Row 4 (optional): Object =
Case, Field =CaseNumber→ for reference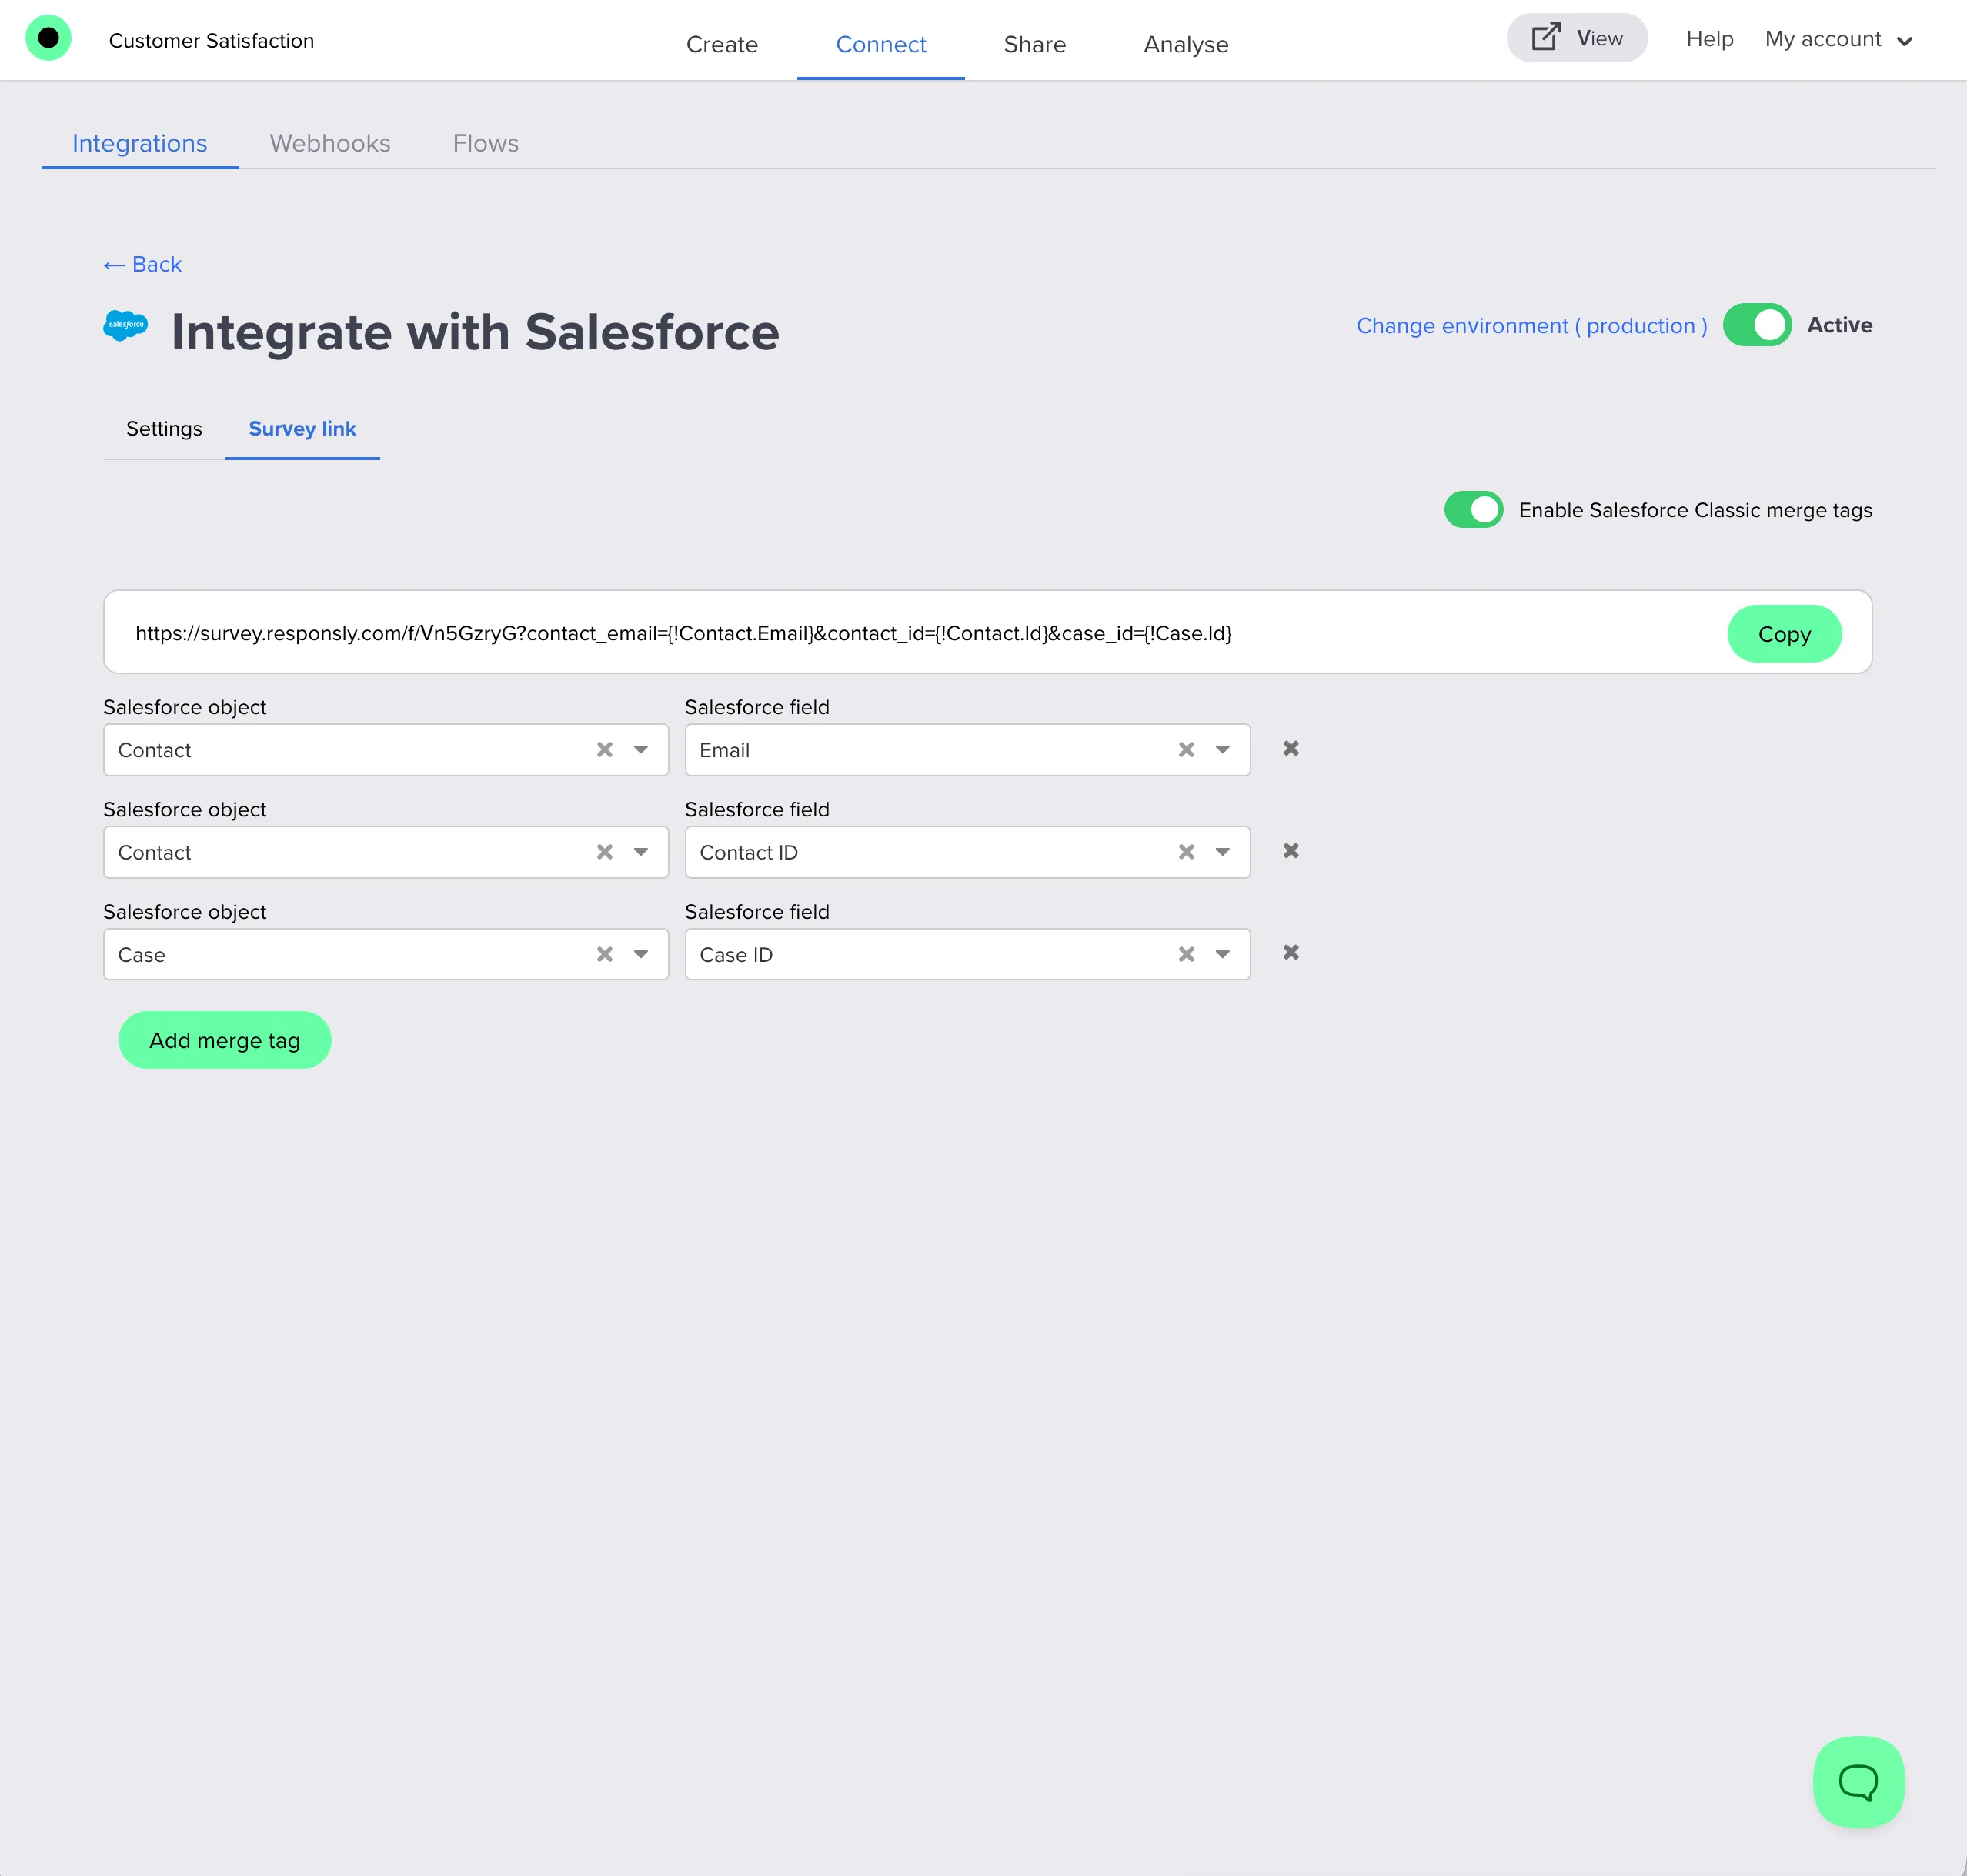
- Click Add merge tag to add each additional row.
- Press Save changes to save the survey link.
- The final survey URL will look like this:
https://form.responsly.com/f/abcd1234?contact_email={!Contact.Email}&contact_id={!Contact.Id}&case_id={!Case.Id}This URL uses Salesforce Classic merge tag syntax ({!Object.Field}). If you are using Lightning email templates, adapt the syntax to {{{Object.Field}}}. In the Salesforce integration settings in Responsly, you can switch between Classic and Lightning merge tag formats using the toggle above the survey link field — the URL will be regenerated automatically in the correct format.
Merge Tag Reference
| Salesforce Edition | Contact Email | Contact ID | Case ID |
|---|---|---|---|
| Classic | {!Contact.Email} | {!Contact.Id} | {!Case.Id} |
| Lightning | {{{Contact.Email}}} | {{{Contact.Id}}} | {{{Case.Id}}} |
Important: The integration does not work for anonymous responses. Respondents must always be identified via merge tags passed in the survey URL.
Step 4: Create Custom Fields in Salesforce for Survey Data
Before you can store survey answers in Salesforce, you need a place to put them.
In this step you create the custom fields on Case and Contact that will hold CSAT / CES / NPS scores and open-text feedback.
- In Salesforce, go to Setup → Object Manager → Case → Fields & Relationships → New.
- Create at least the following fields on the Case object (make sure they are not required on page layouts or validation rules, so case creation and updates do not fail when the survey has not been filled in yet):
- Label: CSAT Score, API Name:
CSAT_Score__c– type Number (for CSAT / CES scores, e.g. 1–5) - Label: CSAT Feedback, API Name:
CSAT_Feedback__c– type Text Area (Long) (for open-text comments) - Optionally: Label: Survey Name, API Name:
Survey_Name__c– type Text (for a static survey identifier, e.g. “Post-Support CSAT Survey”) - Optionally: Label: Survey Completed, API Name:
Survey_Completed__c– type Checkbox (to flag that the survey was completed)
- Go to Setup → Object Manager → Contact → Fields & Relationships → New.
- Create a field on the Contact object for NPS (and any other people-level metrics you want to track). As with the Case fields, keep these optional (not required) so existing processes continue to work even before survey data is available. For example:
- Label: NPS Score, API Name:
NPS_Score__c– type Number (for 0–10 NPS scores)
- Save your changes in Salesforce.
Tip: You can use different API names if you prefer. Just remember which fields you created – you will select them in the next step when mapping questions in Responsly.
Step 5: Map Survey Responses to Salesforce Fields
In this step you decide where exactly each answer from your survey should be stored in Salesforce.
You will connect:
- specific questions from Step 1 → to the custom fields you created in Step 4 on your
CaseandContactrecords.
5a. Update Salesforce Records with Response Data
- In the Salesforce integration settings for your survey, open the Update objects tab.
- For each key question from Step 1, create a mapping to the fields you created in Step 4:
For your CSAT / CES rating question (Satisfaction Score, Rating or Numbers scale type):
- Object:
Case - Field: e.g.
CSAT_Score__c(custom Number field)
- Object:
For your open-text follow-up question (“What could we have done better?”):
- Object:
Case - Field: e.g.
CSAT_Feedback__c(custom Text Area field)
- Object:
For your NPS question (NPS 0–10):
- Object:
Contact - Field: e.g.
NPS_Score__c(custom Number field)
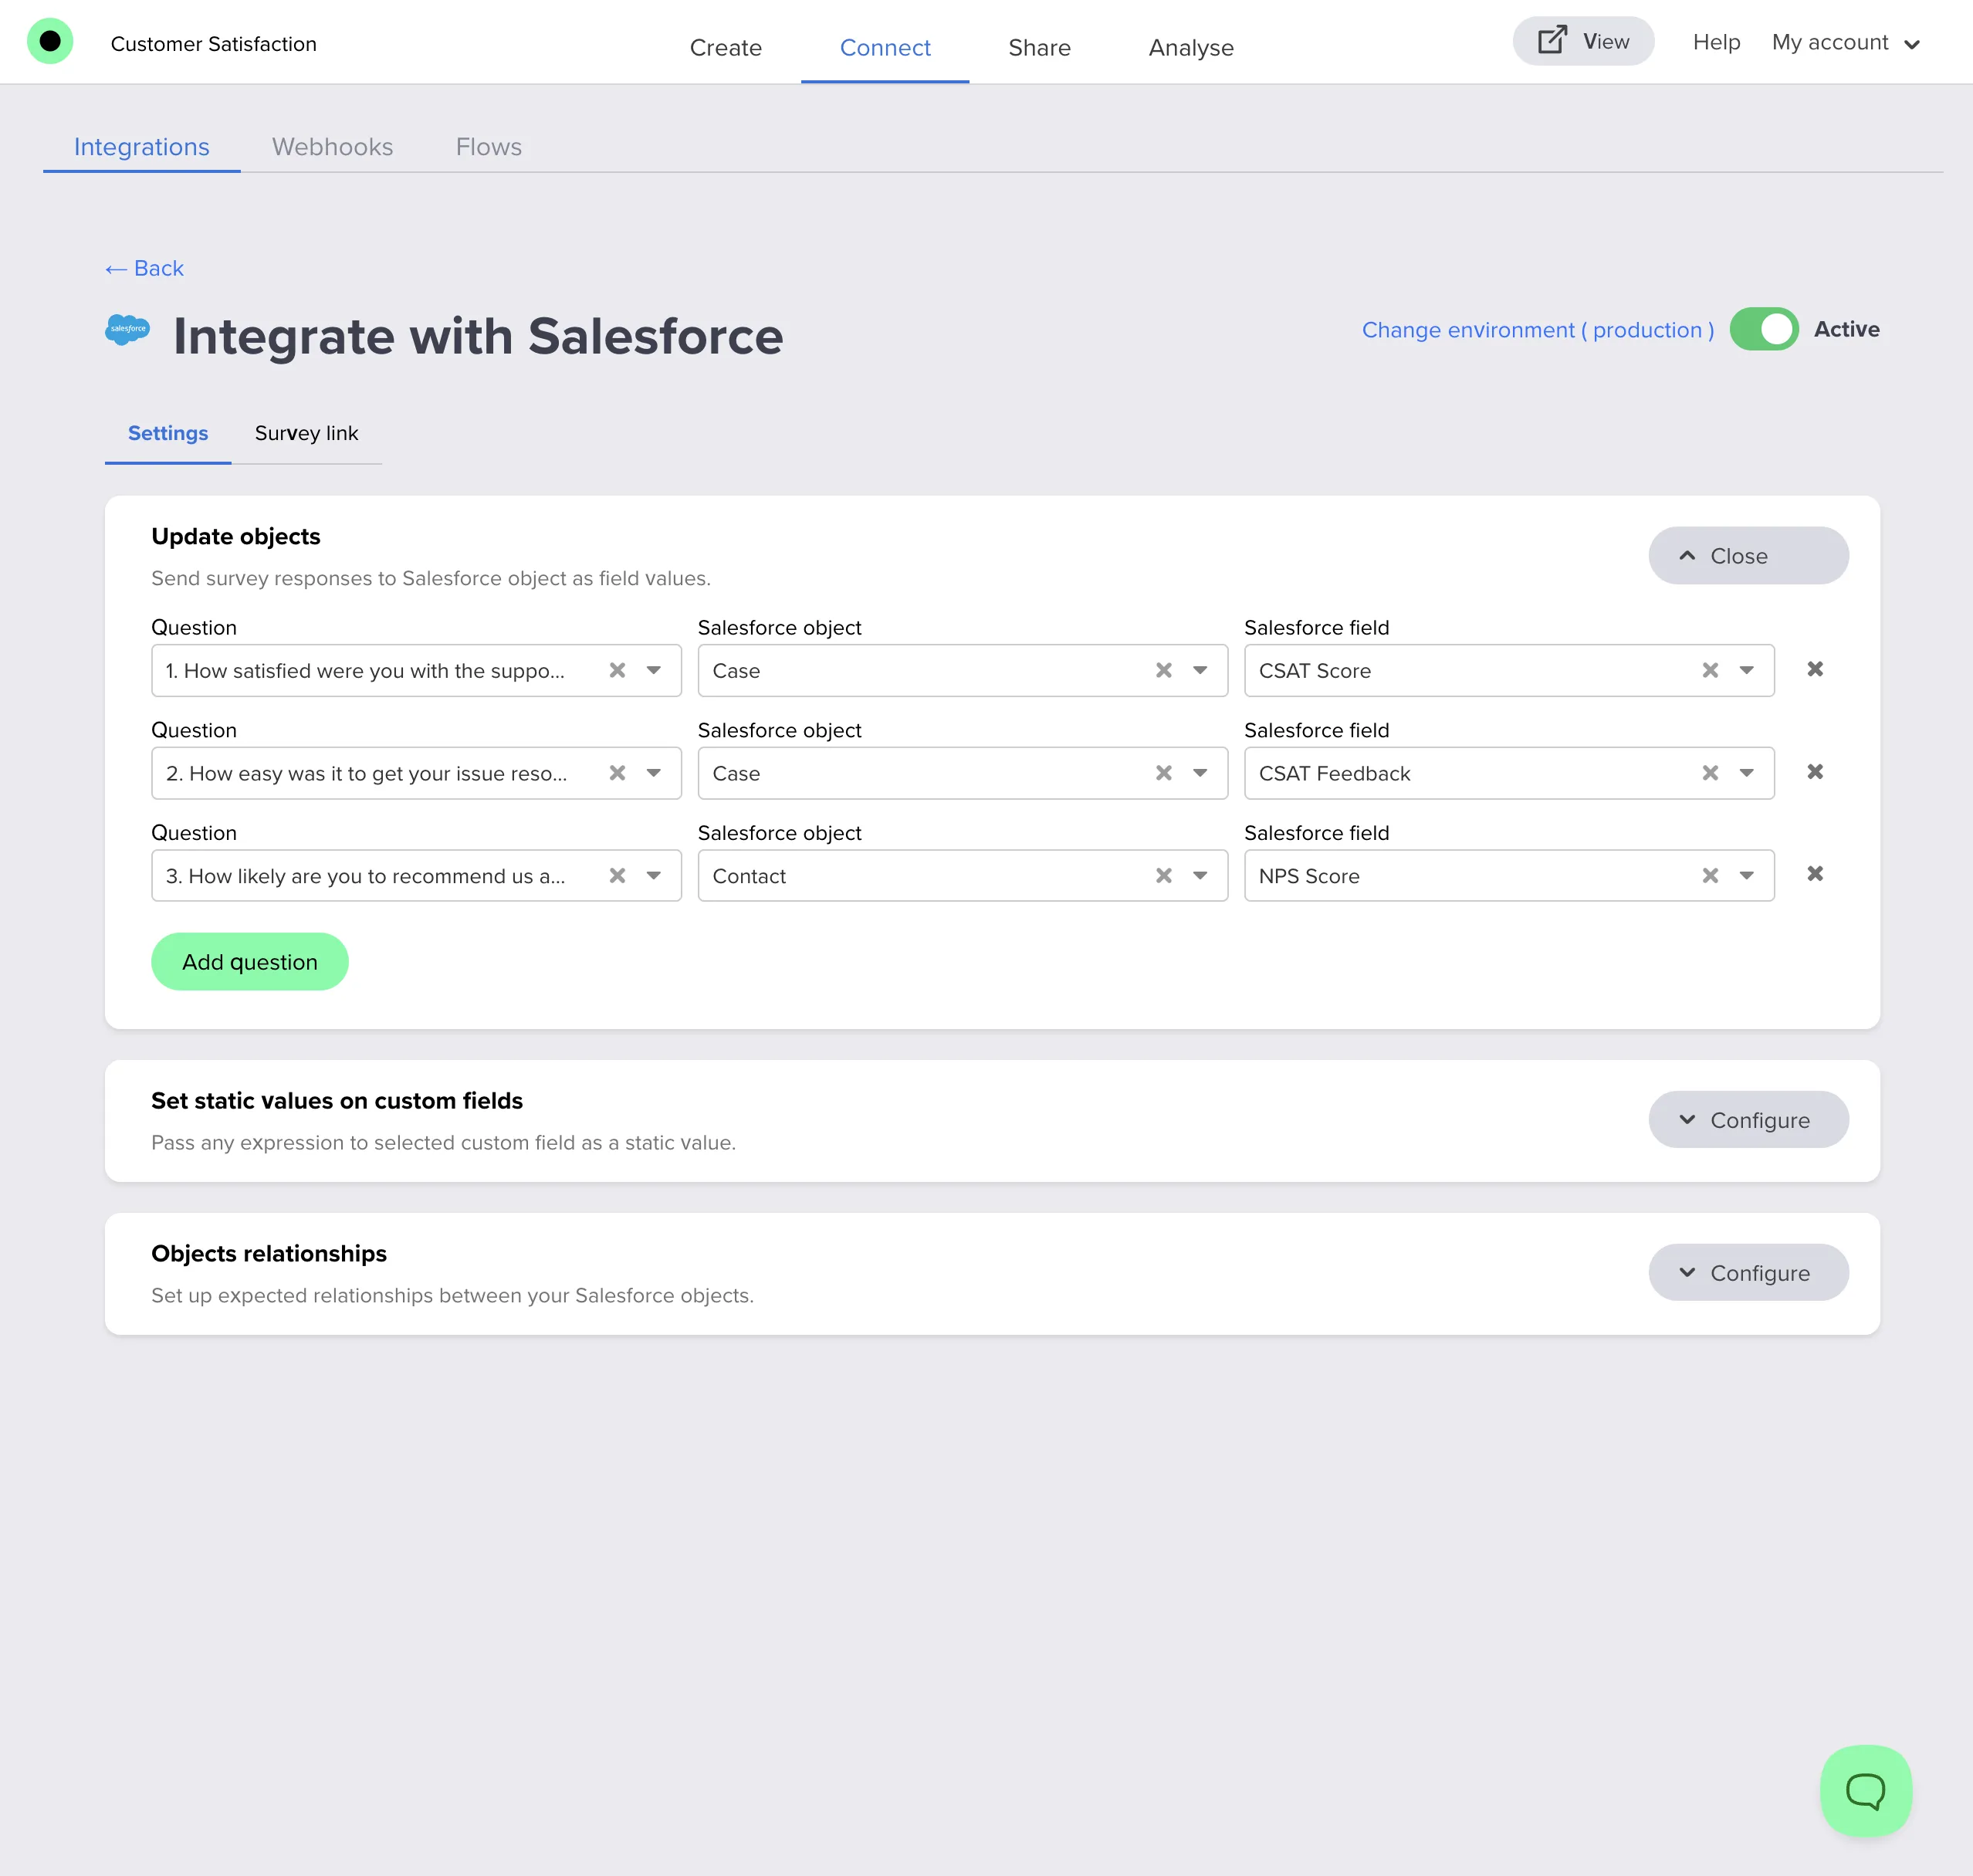
- Object:
- Use Add question to add more mappings whenever you add additional questions to the survey (for example, extra rating questions by product line or channel).
Cache refresh: If newly created Salesforce fields do not appear in Responsly, refresh the page in your browser. The integration will pull the latest list of fields on reload.
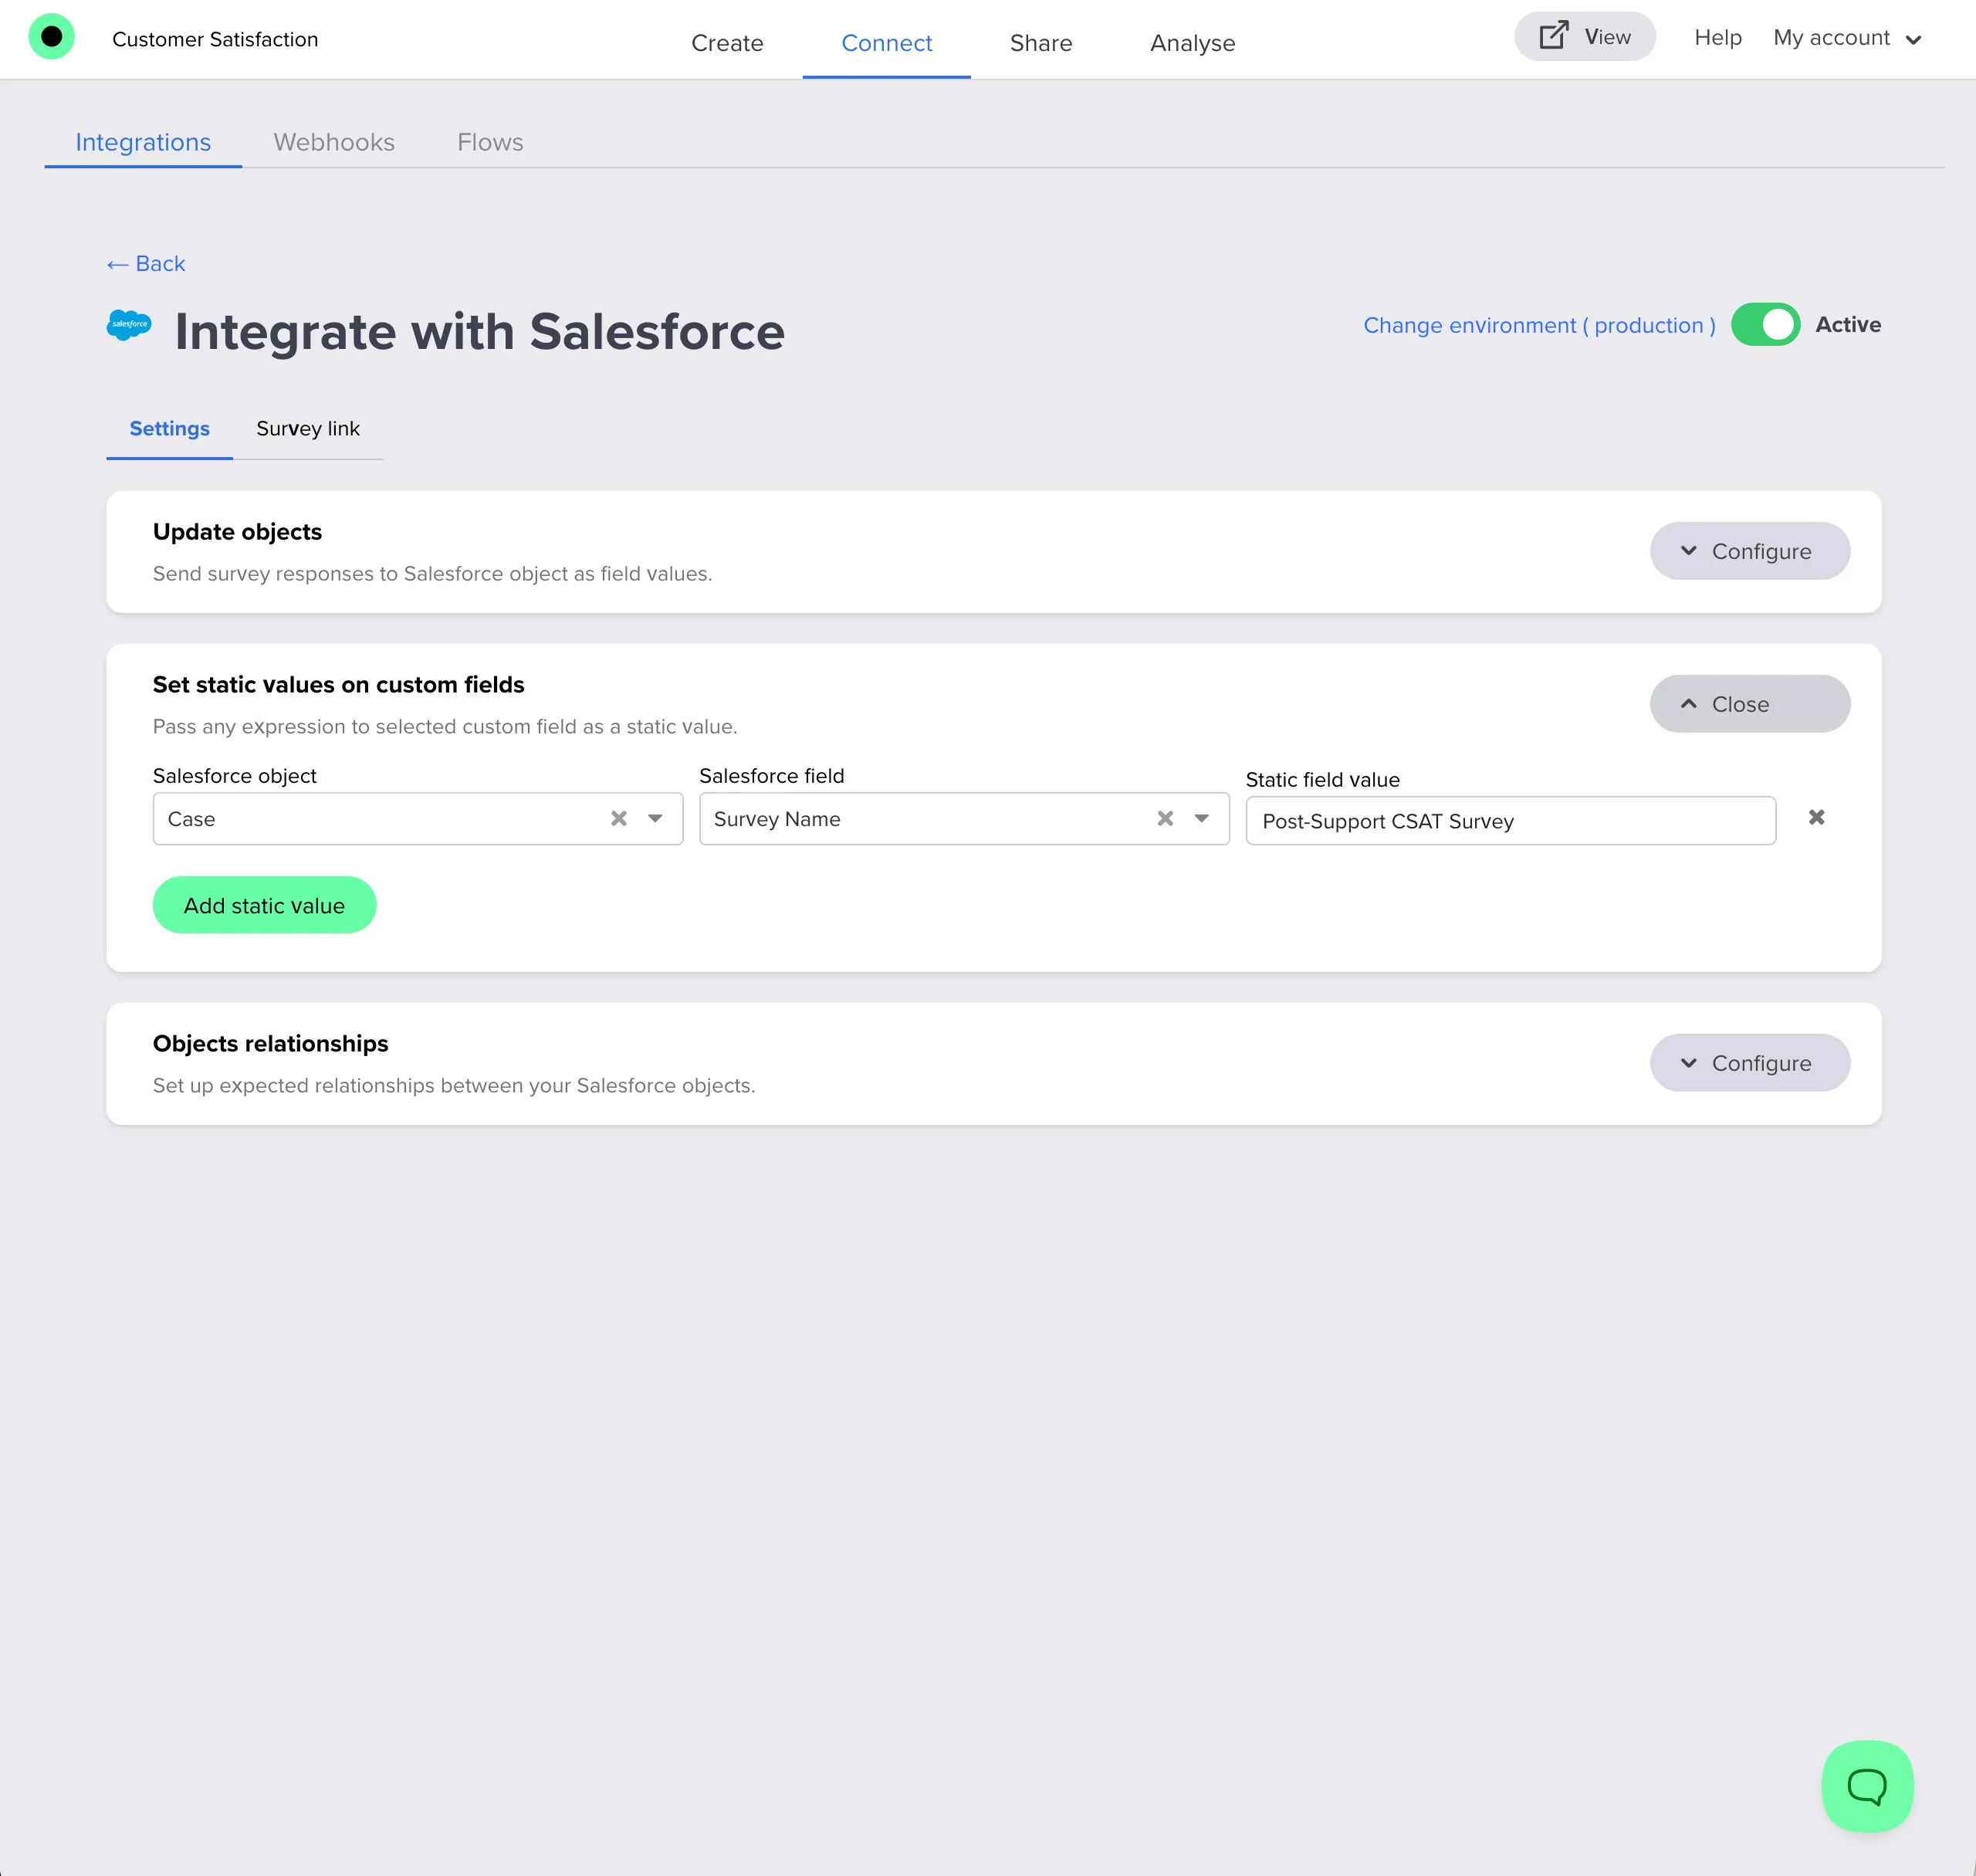
5b. Set Static Values
Static values let you stamp every response with the same label or flag in Salesforce.
This is useful for reporting (for example, when you want to filter only “Post-Support CSAT Survey” cases).
- In the Salesforce integration settings, open the Set static values on custom fields tab.
- Add a static identifier for this survey, for example:
- Object:
Case - Field:
Survey_Name__c(custom Text field) - Value:
Post-Support CSAT Survey
- Optionally add more flags, for example:
- Object:
Case - Field:
Survey_Completed__c(custom Checkbox field) - Value:
true
This makes it easy to build Salesforce reports or flows that only target cases where the survey was completed.
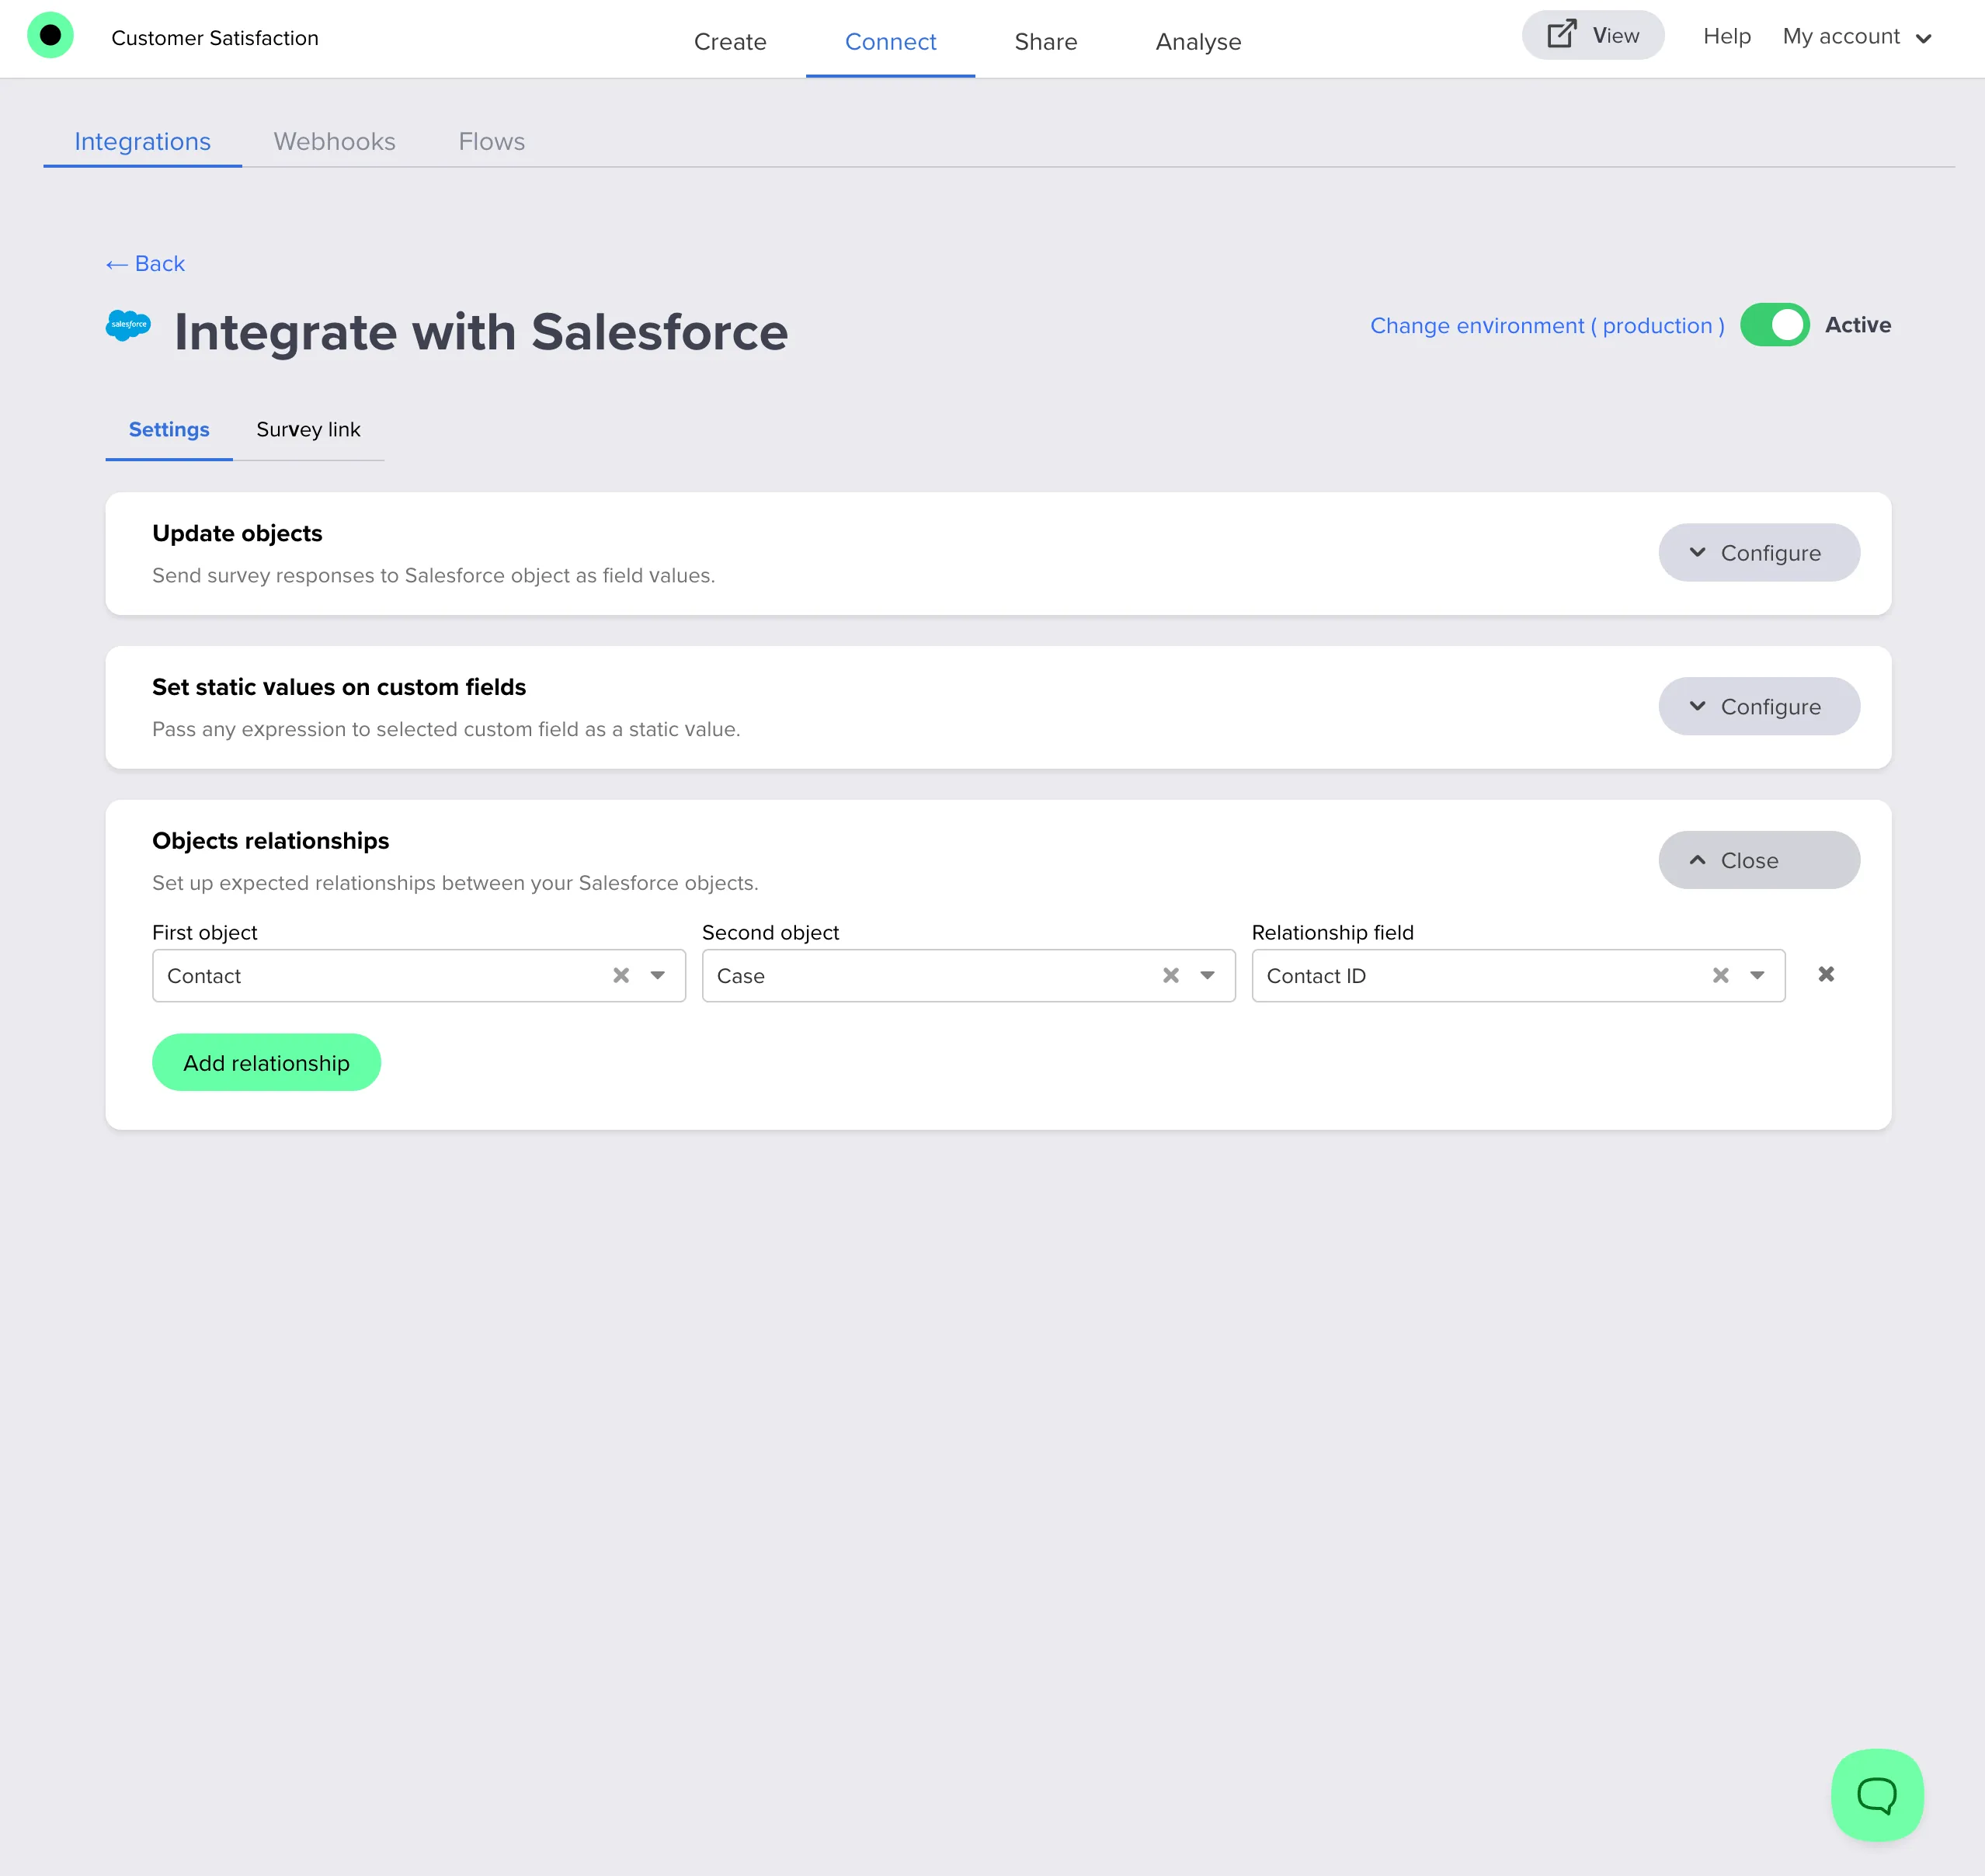
5c. Configure Object Relationships
Use object relationships when you want Responsly to automatically link records together in Salesforce using the IDs you passed in the survey URL in Step 3
– for example, associating a Case with a Contact using the Contact’s ID.
- In the Salesforce integration settings in Responsly, open the Objects relationships section.
- For First object, choose the parent object – the one whose ID you passed in the URL in Step 3 (for example,
Contactif you includedcontact_idin the survey link). - For Second object, choose the child object that holds the lookup field (for example,
Case, which has aContactIdlookup toContact). - For Relationship field, select the unique ID field on the first object, e.g.
IdonContact.
- Responsly will expect a URL parameter (merge tag variable) named using the pattern
first_object_field, for examplecontact_id, in the survey link from Step 3. - When responses come in, Responsly uses this value to populate the correct lookup field on the second object (for example,
ContactIdonCase) when creating or updating Salesforce records, so your Cases and Contacts stay correctly linked.
Step 6: Create a Salesforce Email Template with the Survey Link
In this step you will create a simple email template in Salesforce that contains a link to your Responsly survey.
- In Responsly, go to the Share tab of your survey.
- Copy the public survey link with Salesforce merge tags from Step 3 (for example, the URL that includes
contact_email,contact_idandcase_idparameters). - In Salesforce, create a new email template:
For Salesforce Lightning:
- Navigate to Setup → Classic Email Templates → New Template.
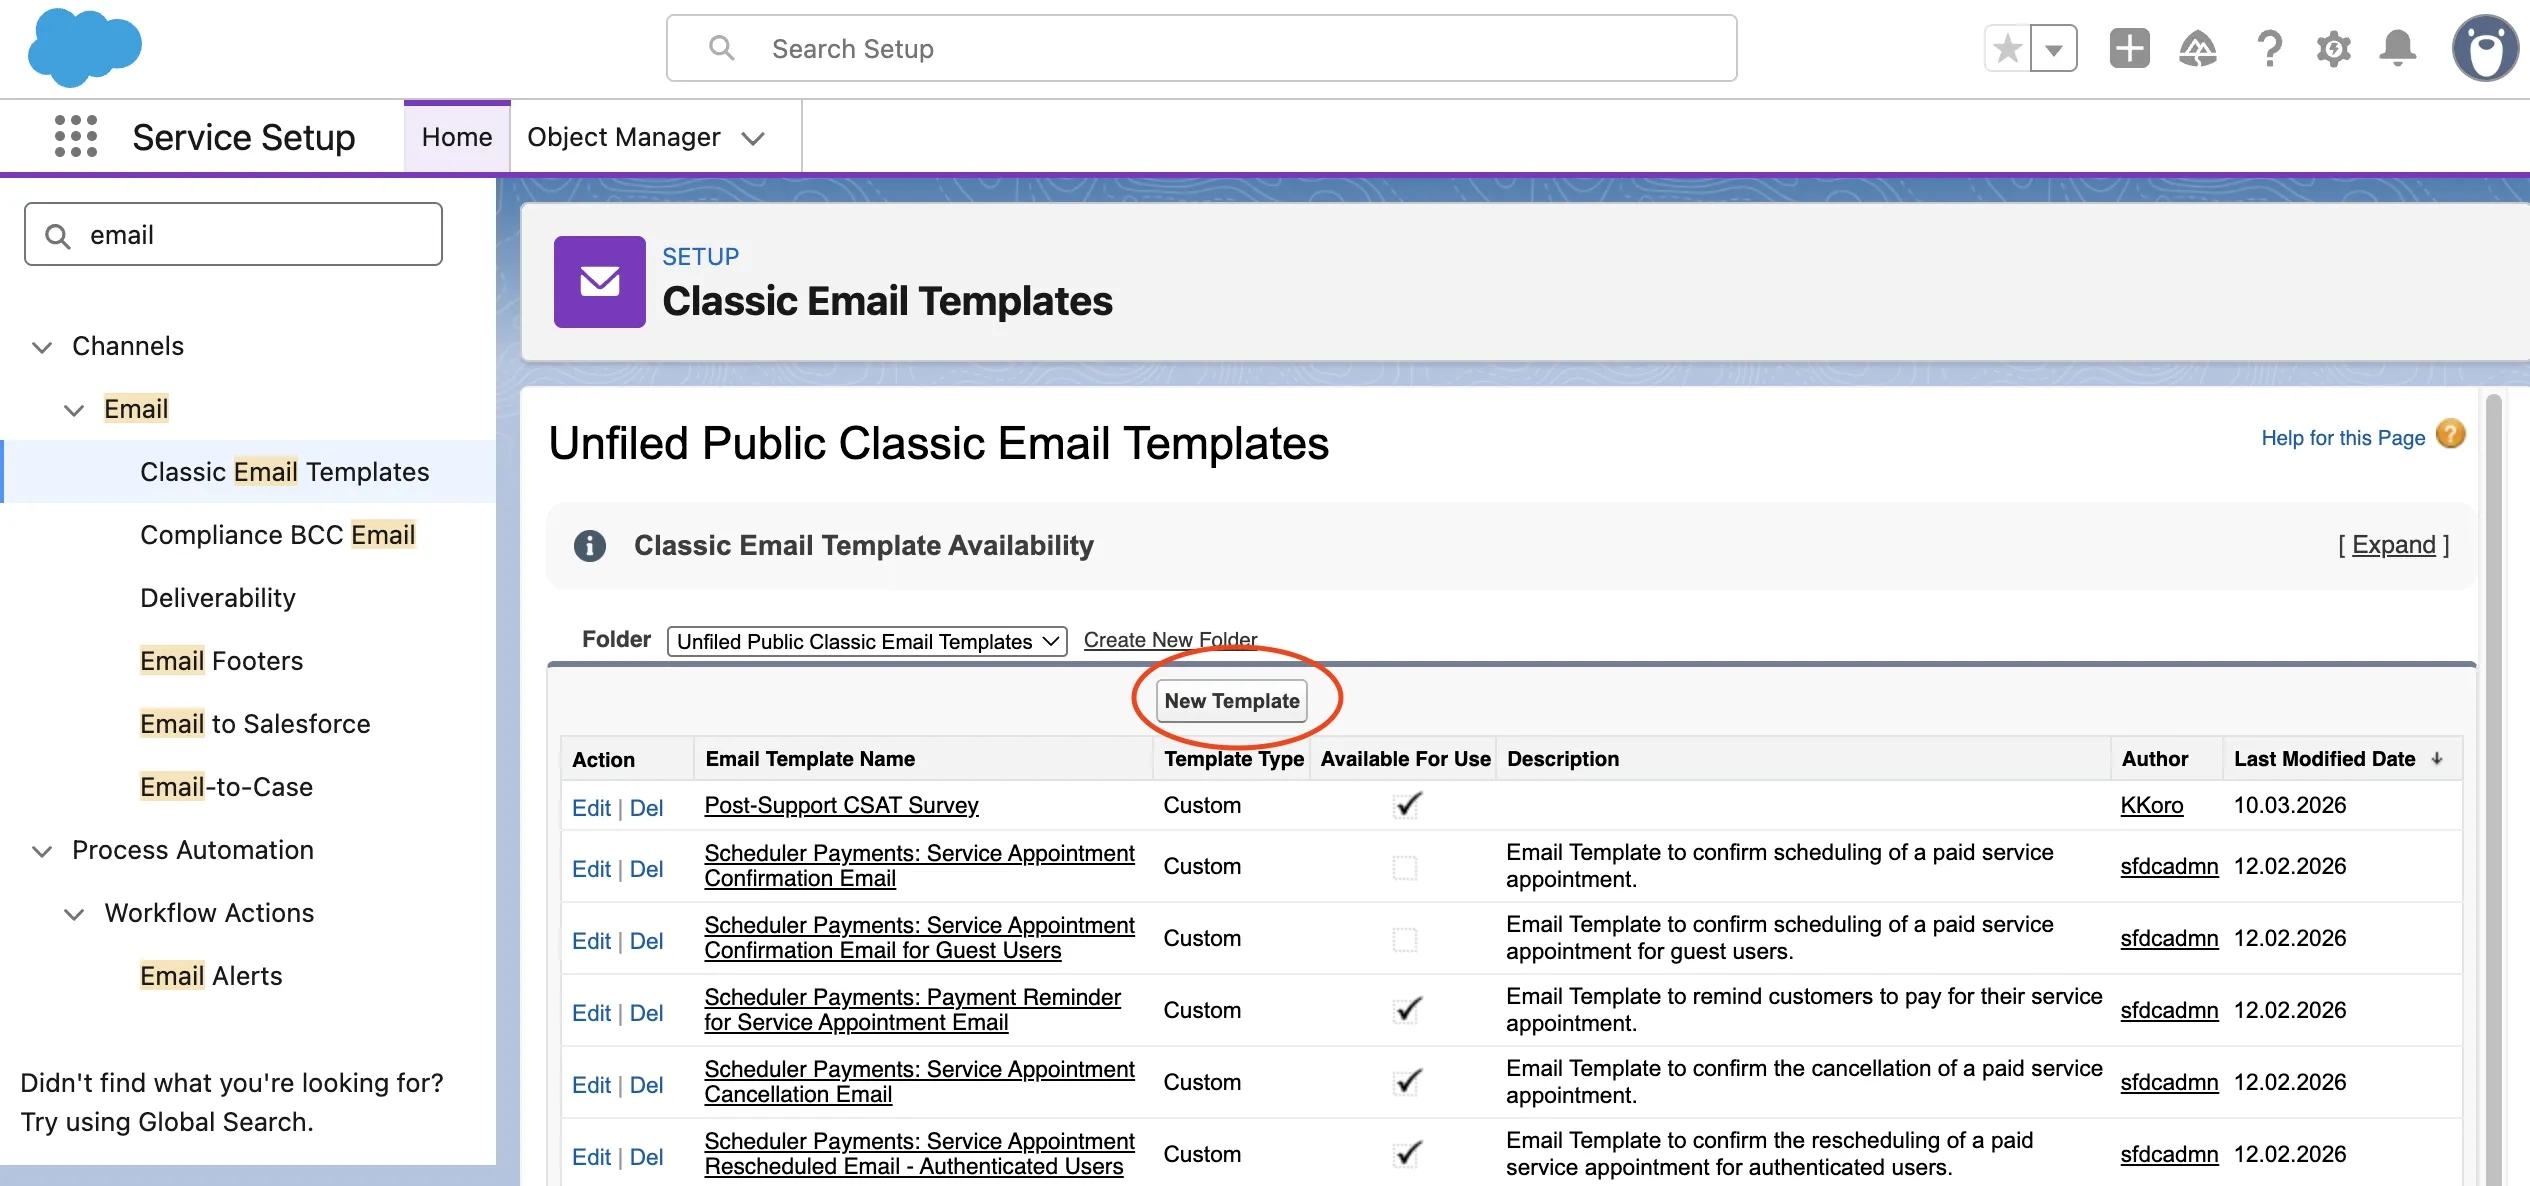
- Choose Custom (without Classic Letterhead).
- Enter a template name, e.g.,
Post-Support CSAT Survey. - Set the subject line, e.g.,
Your case {!Case.CaseNumber} has been resolved — how did we do? - In the HTML body, add your email copy and insert a button or hyperlink with text such as “Tell us about your experience” that points to the Responsly survey link you copied in step 2.
- Ensure any merge tags in the link use the correct syntax (Classic
{!Object.Field}or Lightning{{{Object.Field}}}depending on your templates). - Check the Available For Use checkbox so the template can be used by Workflow Rules and Email Alerts.
- Save the template.
For Salesforce Classic:
- Navigate to Setup → Email Templates → New Template.
- Choose Custom (without Classic Letterhead).
- Switch to HTML formatting.
- Add your email copy and insert a button or hyperlink with text such as “Tell us about your experience” that points to the Responsly survey link you copied in step 2.
- Check the Available For Use checkbox so the template is active and visible for automation.
- Save the template.

Example HTML Email Template (Copy & Paste)
You can use the following minimal HTML template as a starting point.
Paste it into the HTML body of your Salesforce email template and replace the URL with your own survey link from Step 3 (including your workspace domain and merge tags):
<html>
  <body style="font-family: Arial, sans-serif; font-size: 14px; color: #333;">
    <p>Hi {!Contact.FirstName},</p>

    <p>
      Your support case <strong>{!Case.CaseNumber}</strong> has just been resolved.
      We’d really appreciate it if you could take a few seconds to rate your experience.
    </p>

    <p style="margin: 24px 0;">
      <a
        href="YOUR SURVEY URL HERE"
        style="background-color:#66FFA7;color:#ffffff;padding:12px 20px;text-decoration:none;border-radius:40px;display:inline-block;"
      >
        Tell us about your experience
      </a>
    </p>

    <p>
      Your feedback helps us improve our support and fix issues faster.
    </p>

    <p>
      Thank you,<br />
      The Support Team
    </p>
  </body>
</html>
Step 7: Automate Survey Sending with a Workflow Rule
Now you will tell Salesforce when to send the survey email.
In this example, the email goes out automatically when a Case is closed.
7a. Create a Workflow Rule on Case
- In Salesforce, go to Setup.
- In the Quick Find box, type Workflow Rules and select Workflow Rules under Process Automation.
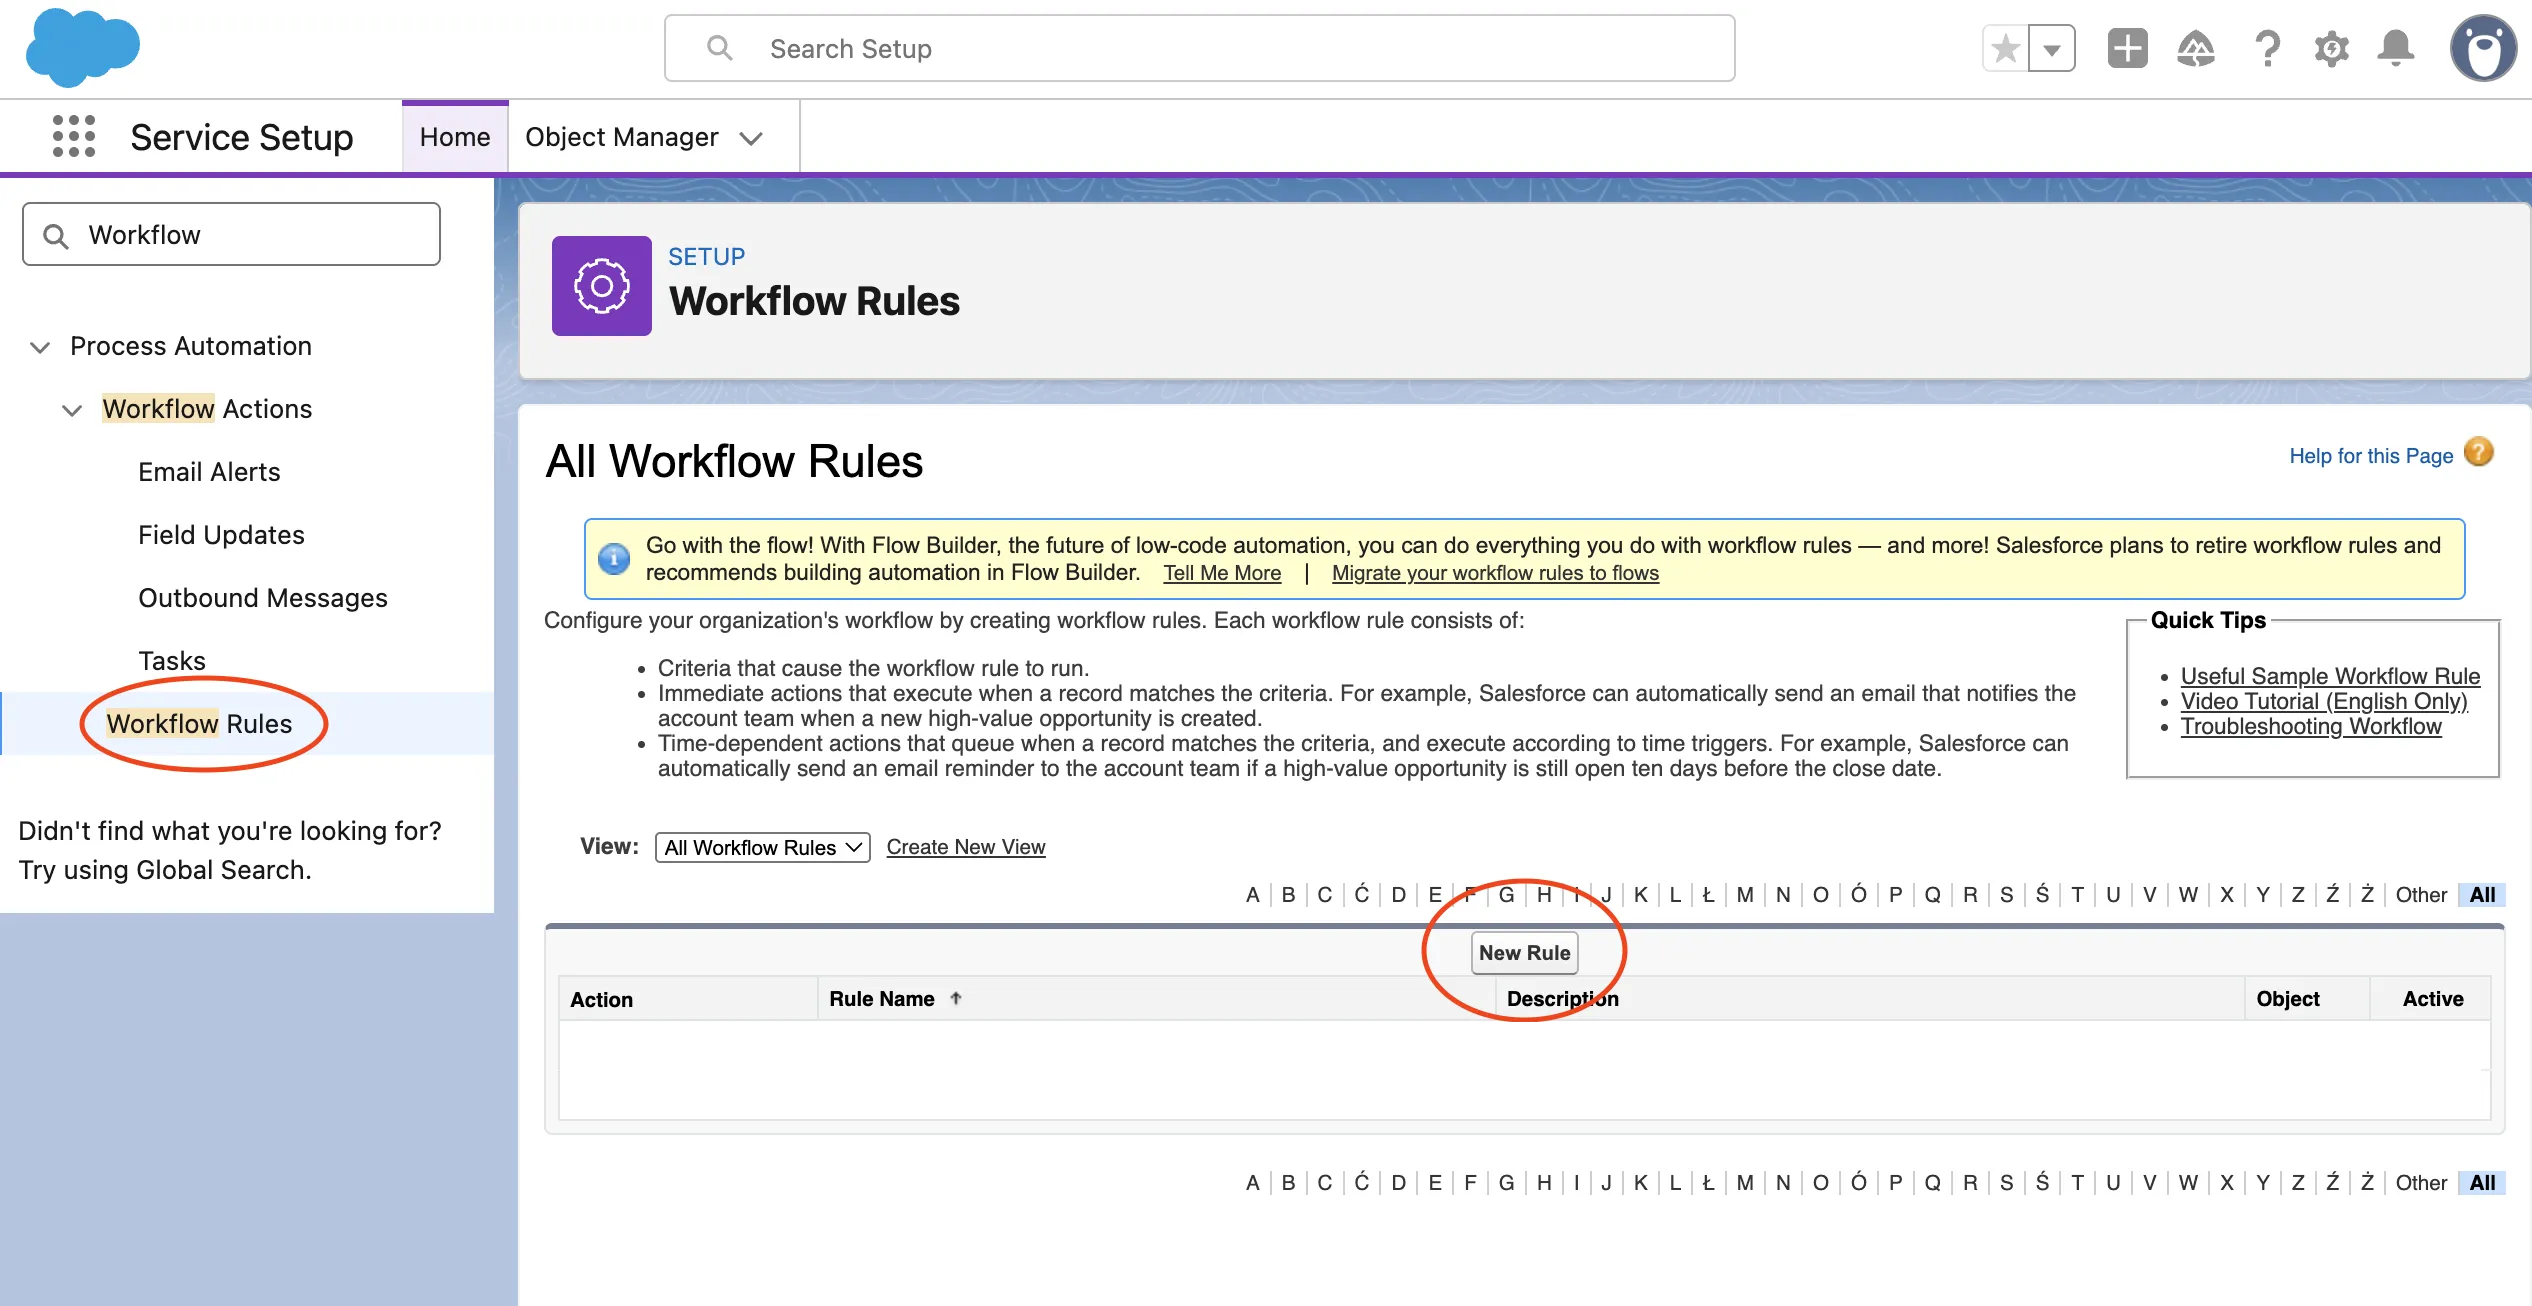
- Click New Rule.
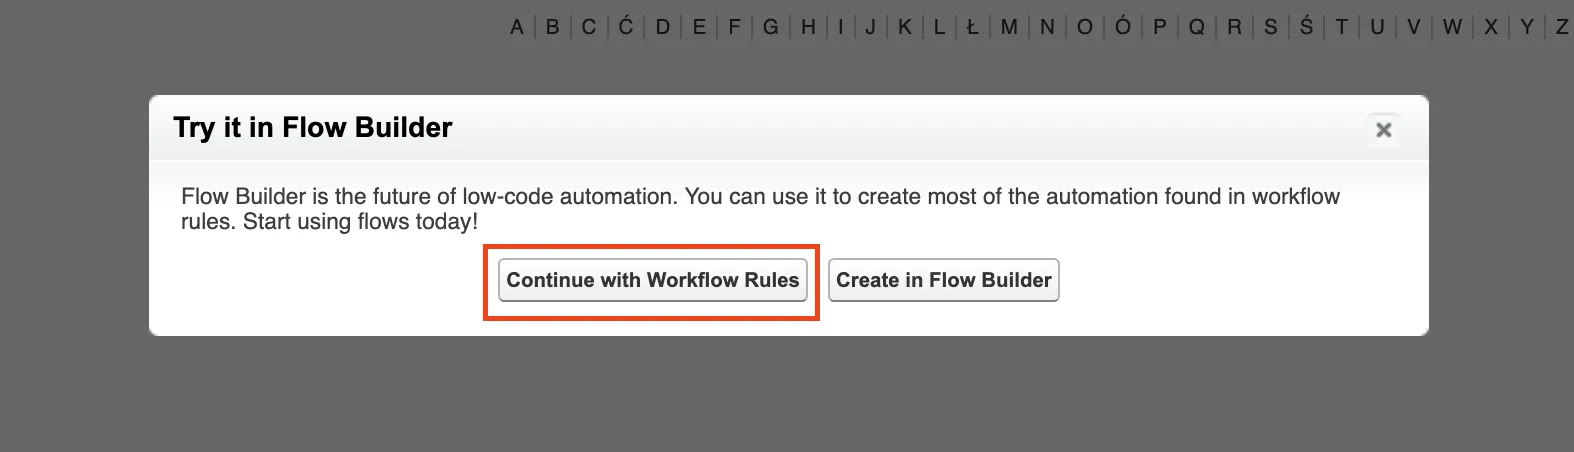
- If Salesforce shows a dialog suggesting Flow Builder with options like Continue with Workflow Rules and Create in Flow Builder, click Continue with Workflow Rules to follow this guide.
- For Object, choose
Caseand click Next. - Configure the rule criteria:
- Rule Name:
Case Closed - Send Post-Support Survey - Evaluate the rule when a record is:
created, and every time it’s edited - Rule Criteria:
- Field:
Case: Is Closed - Operator:
equals - Value:
True
- Field:
- Click Save & Next.
7b. Add the Survey Email Action
- In the Add Workflow Action section, click Add Workflow Action → New Email Alert.
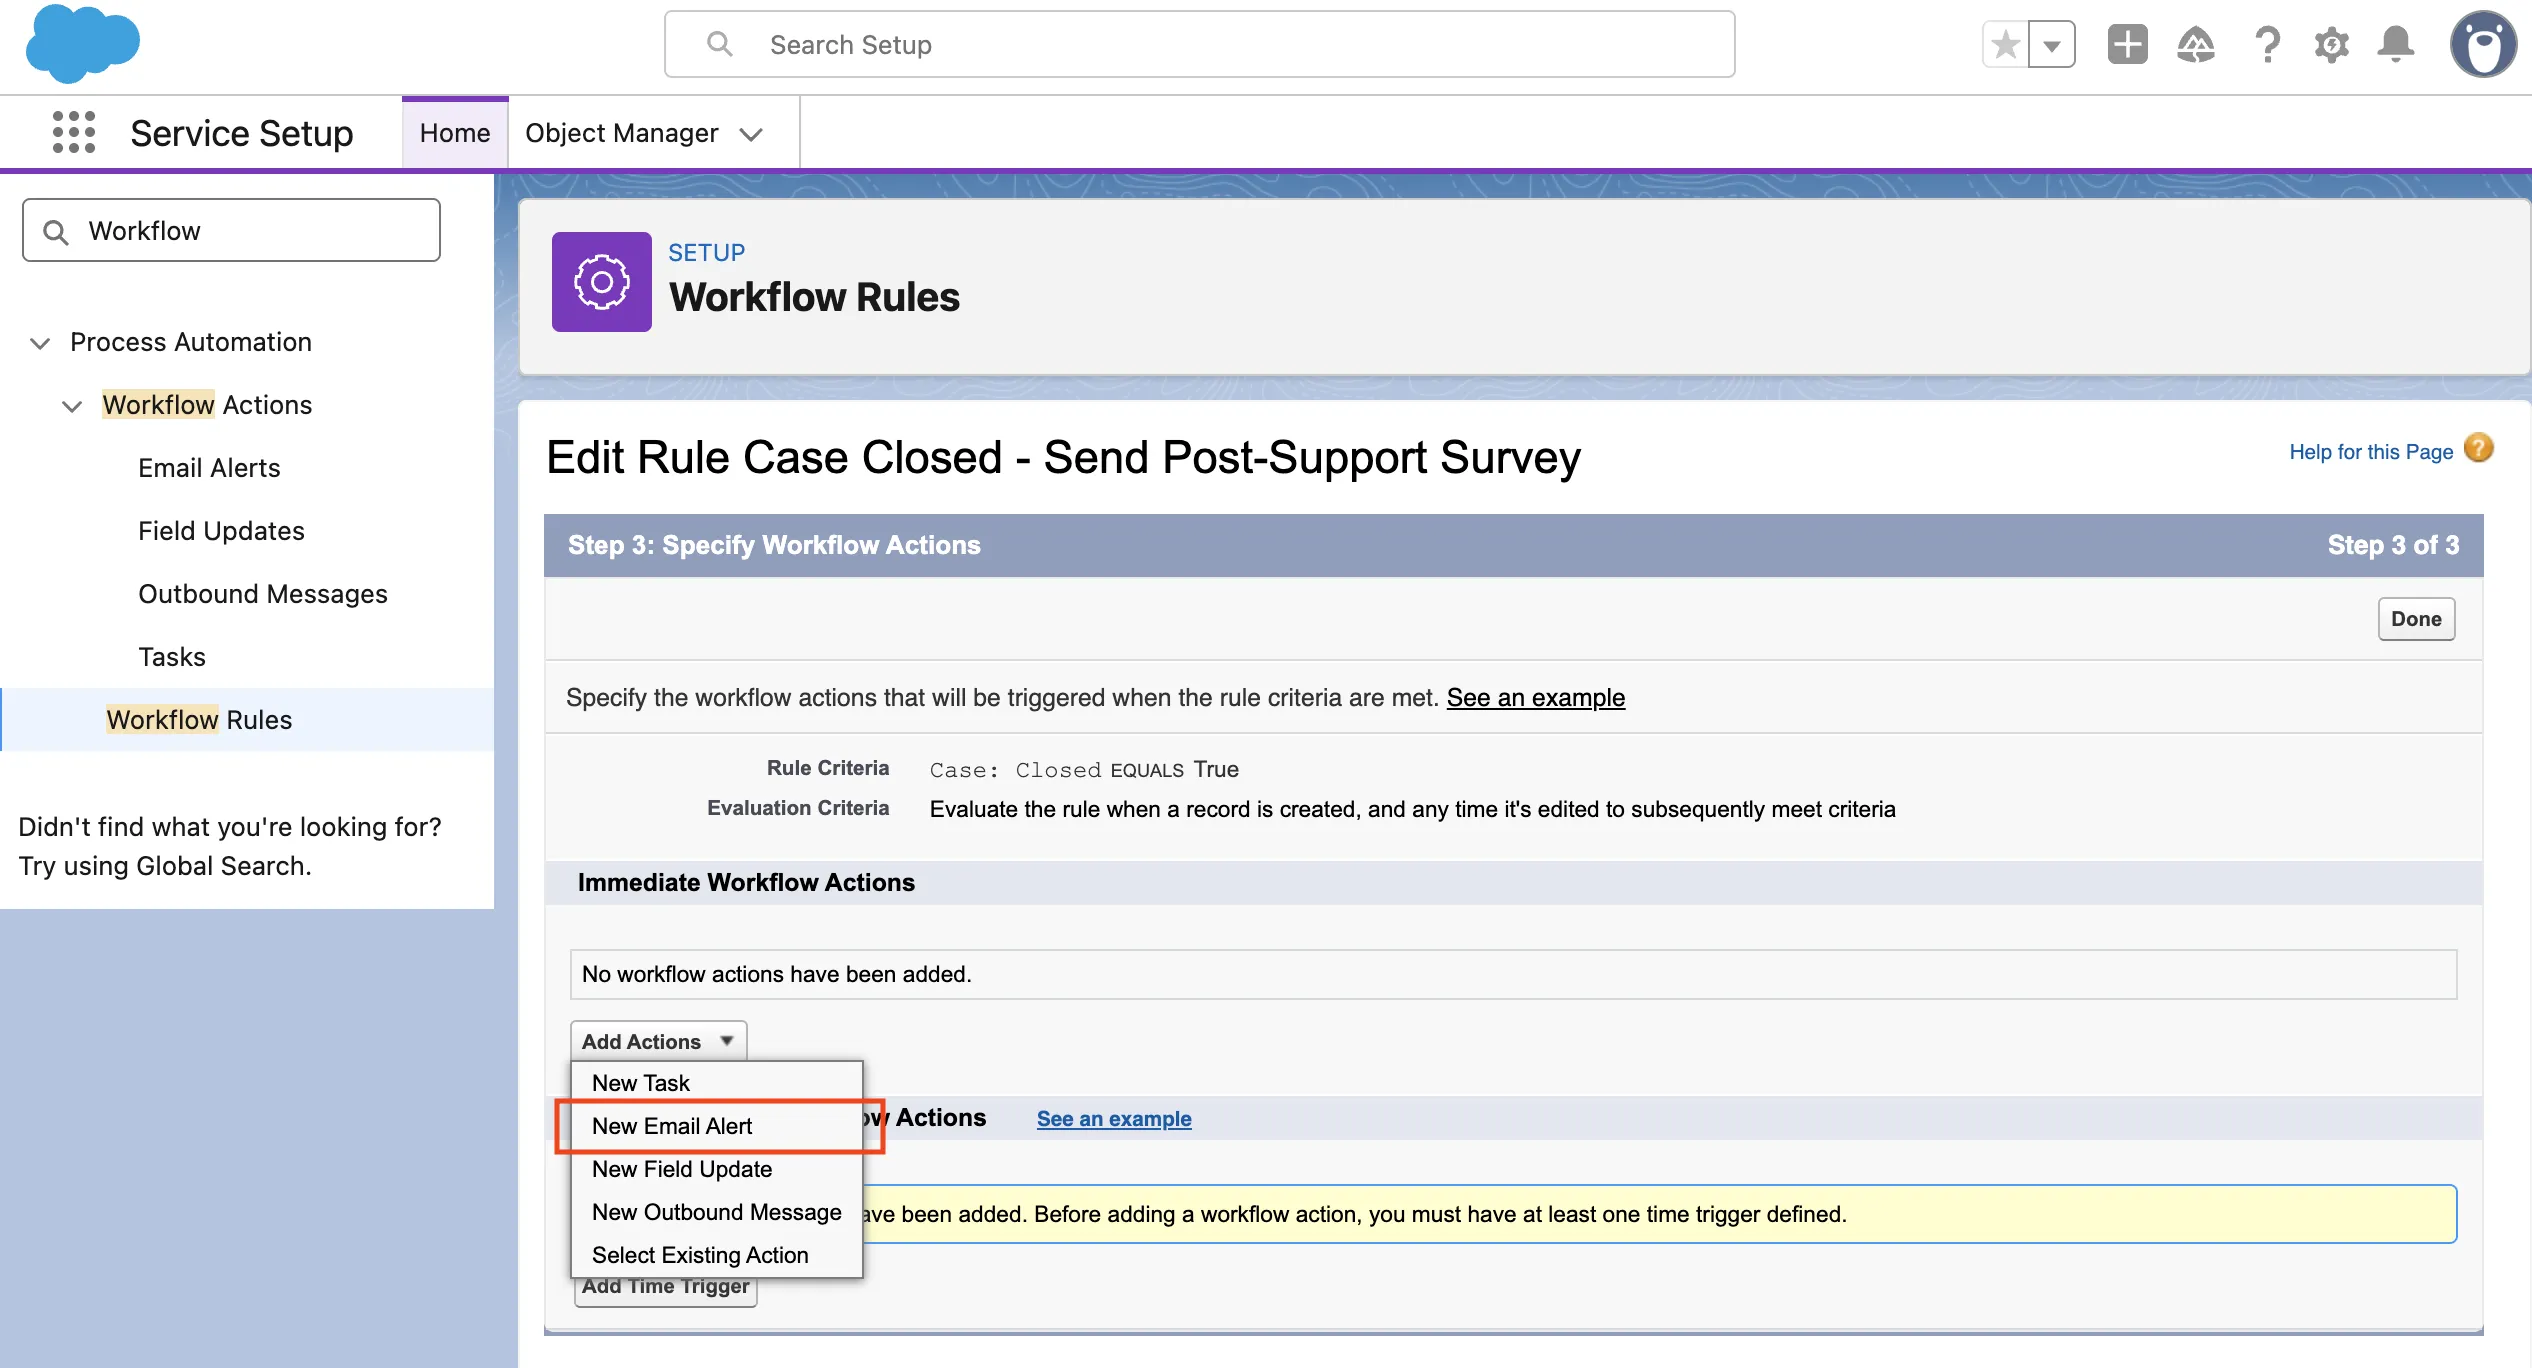
- On the Email Alert form, fill in the basic details:
- Description:
Post-Support Survey Email - Object:
Case - Email Template: choose the template you created in Step 6
- Choose who should receive the survey:
- In Recipient Type, change the dropdown from
Userto Email Field. - In the Available Recipients list, pick the appropriate email field (for example Related Contact or a specific email field on the Case such as
Contact Email), then click Add so it appears under Selected Recipients.
- Optionally, add any Additional Emails (for testing) and adjust the From Email Address if needed.
- Click Save to add the email alert to the rule.
7c. Activate the Rule
- On the Workflow Rule detail page, click Done.
- Click Activate to turn the rule on.
From now on, whenever a Case is closed, Salesforce will automatically send the email with your Responsly survey link or embedded question.
Step 8: Test the Integration
Always test end-to-end before deploying to production.
- Create a test Contact in Salesforce with a valid email address you control.
- Create a test Case linked to that Contact.
- Close the Case by changing its status to “Closed” (or your org’s equivalent).
- Check your inbox — you should receive the post-support survey email within a few minutes.
- Complete the survey from the email.
- Verify in Salesforce:
- Open the test Case record → Details tab → confirm the CSAT score and feedback fields are populated.
- Open the test Contact record → confirm the NPS score field is updated (if mapped).
- Verify in Responsly:
- Navigate to the Analyze tab in your survey → confirm the response appears with the correct hidden variable data (contact email, case ID).
Troubleshooting Checklist
| Issue | Solution |
|---|---|
| Email not sent after closing case | Verify the Flow is activated. Check that entry conditions match your case close status. |
| Survey responses not syncing to Salesforce | Ensure merge tags are correctly appended to the survey URL. Check that the Contact email in Salesforce matches the respondent. |
| New custom fields not visible in Responsly | Reauthorize the Salesforce integration from the Connect tab to force a cache refresh. |
| Pop-up not appearing during authorization | Enable pop-ups for app.responsly.com in your browser settings. |
| Duplicate survey emails sent | Set the Flow to run only when a record is updated to meet the condition requirements (not on every update). |
| Field type mismatch errors | Ensure Salesforce field types match the data Responsly sends — use Text fields for maximum compatibility. |
Step 9: Automate Follow-Up Actions Based on Survey Responses
Close the feedback loop by creating additional automation in Salesforce triggered by survey response data.
Example: Escalate Detractors
Create a Workflow Rule or Flow that triggers when a CSAT score is low:
- Navigate to Setup → Process Automation → Workflow Rules.
- Click New Rule, Object:
Case.
- If Salesforce shows a dialog suggesting Flow Builder with buttons like Continue with Workflow Rules and Create in Flow Builder, click Continue with Workflow Rules to follow this example.
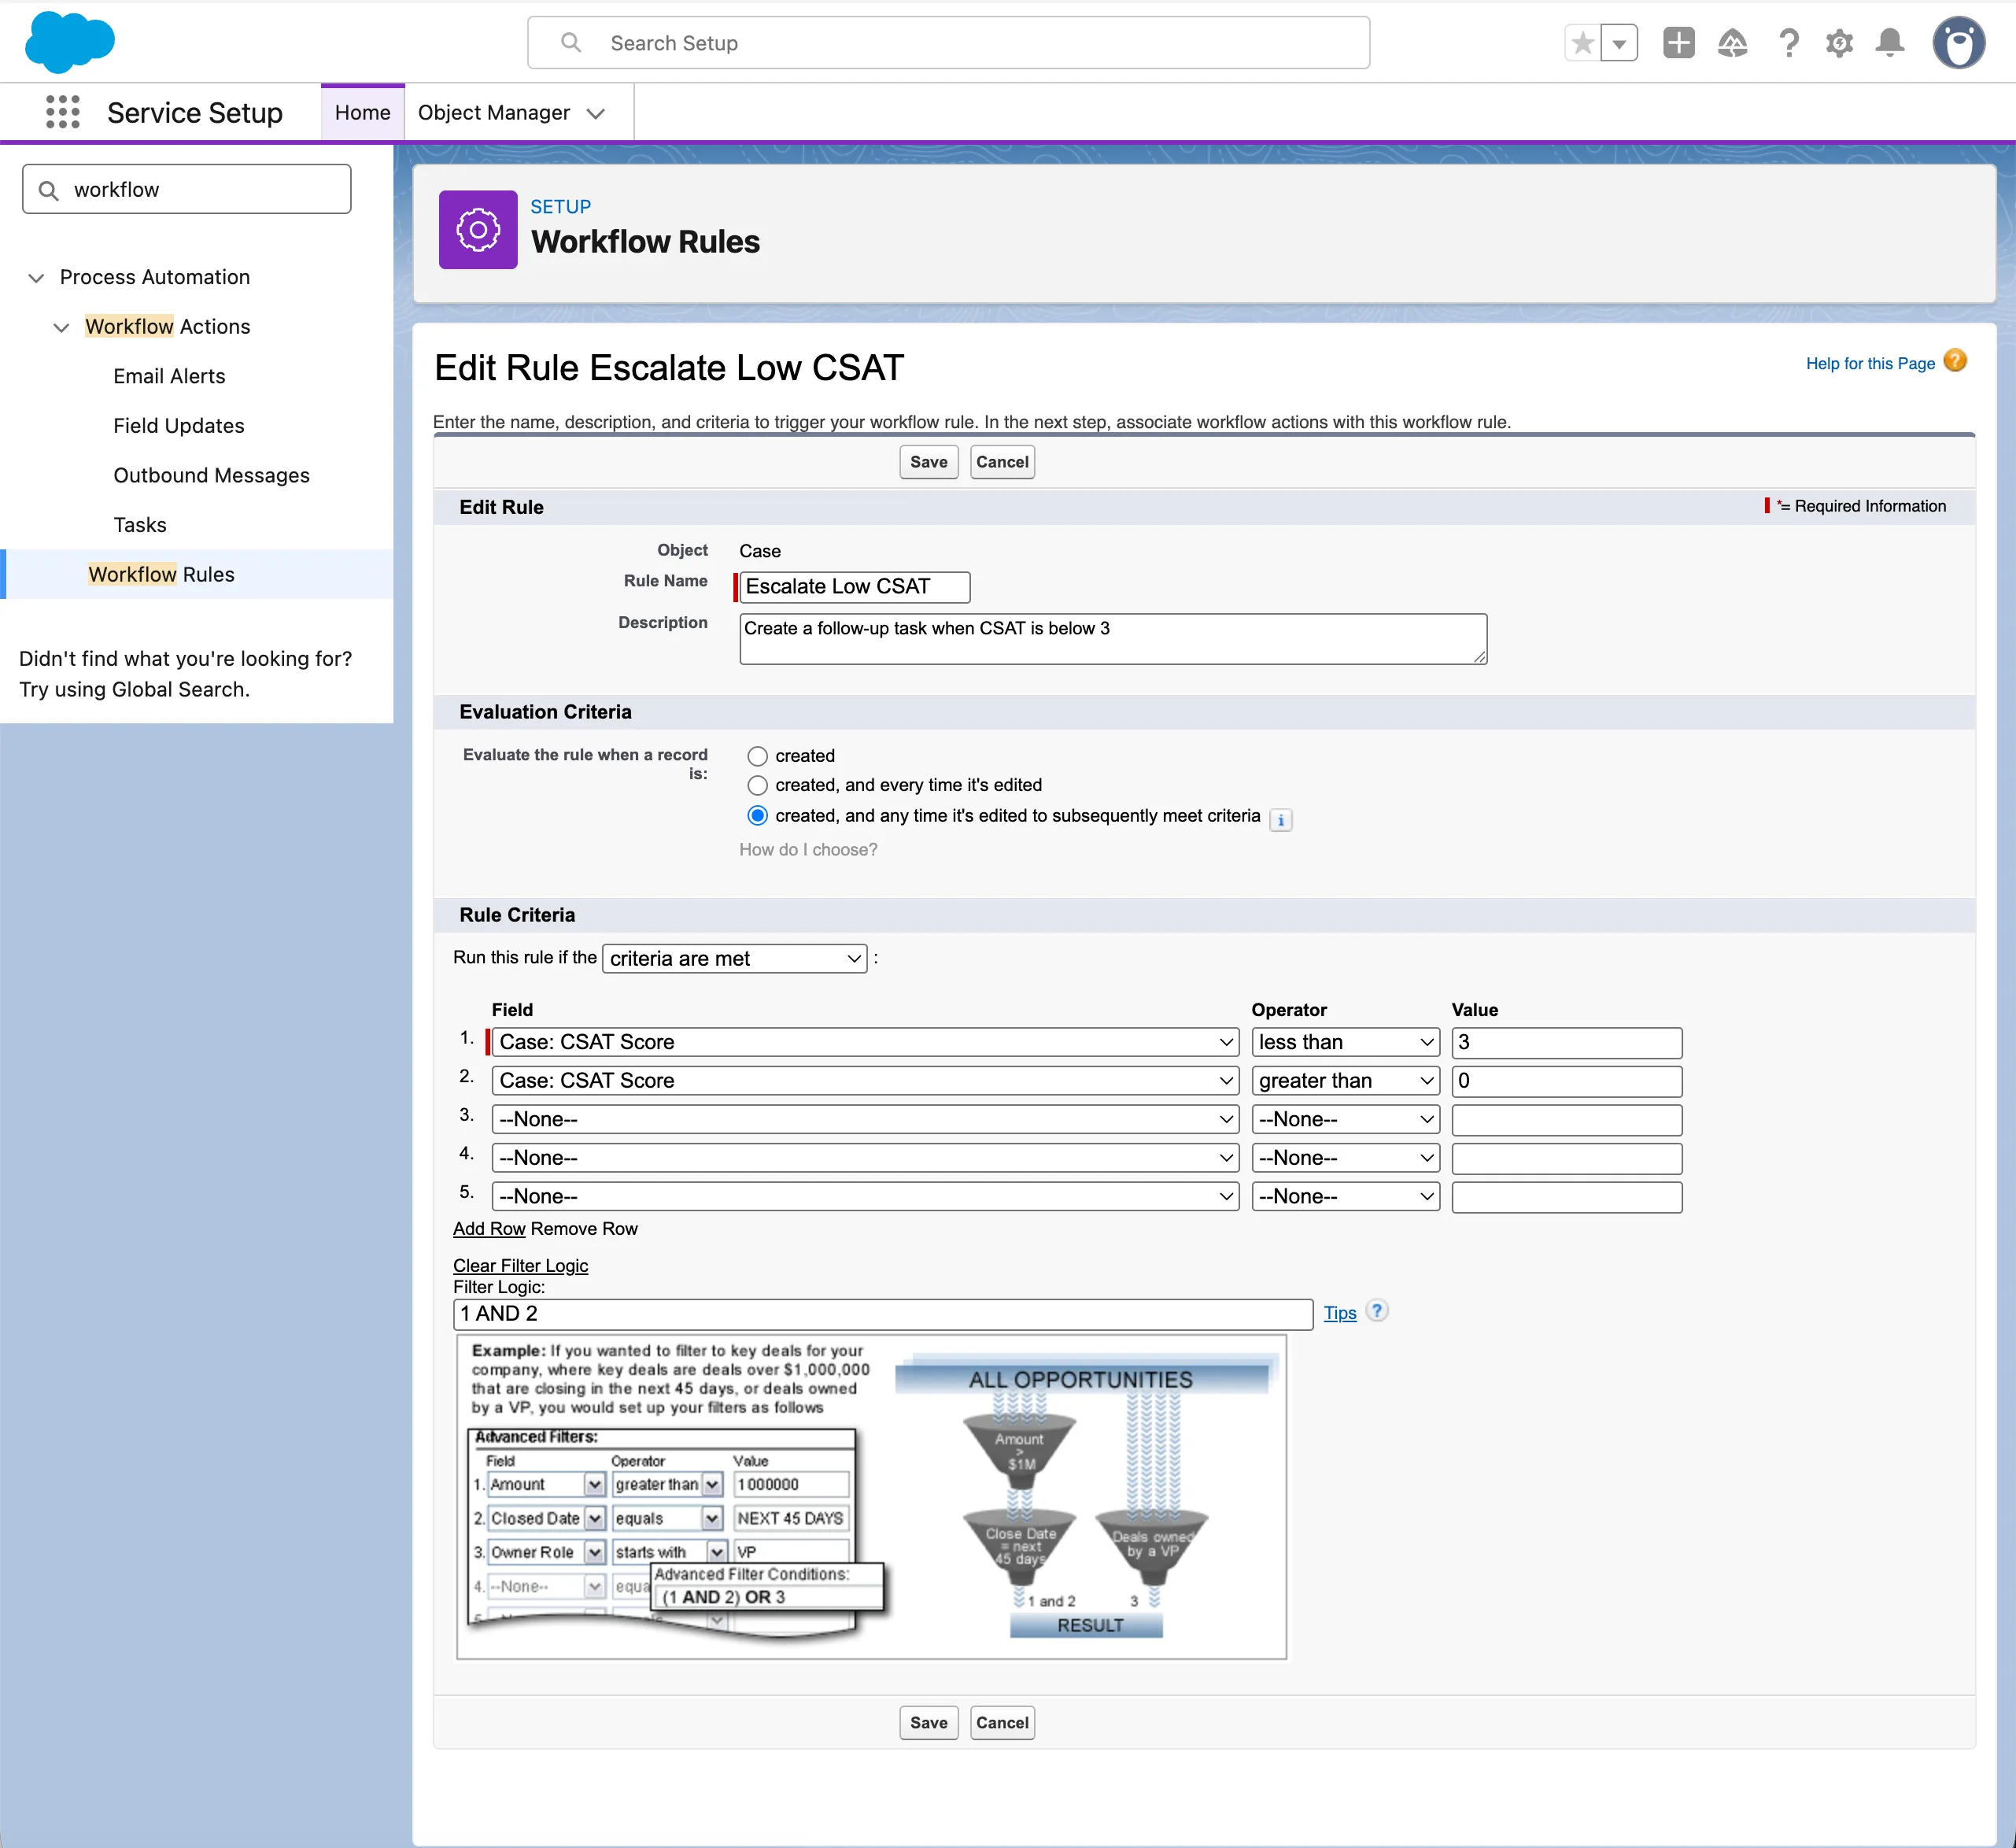
- On the New Workflow Rule – Case screen, fill in the form:
- Rule Name:
Escalate Low CSAT - Description: e.g.
Create a follow-up task when CSAT is below 3 - Evaluate the rule when a record is:
created, and any time it’s edited to subsequently meet criteria
(this way the rule will only fire once the case is updated with a low CSAT score, not on every creation/edit) - Under Rule Criteria:
- Set Run this rule if to
criteria are met - Configure two conditions:
- Row 1
- Field:
Case: CSAT Score(API nameCSAT_Score__c) - Operator:
less than - Value:
3
- Field:
- Row 2
- Field:
Case: CSAT Score - Operator:
greater than - Value:
0
- Field:
- Row 1
- Click Add Filter Logic… and set Filter Logic to
1 AND 2so the rule only runs when CSAT has a value between 0 and 3 (i.e. not empty).
- Set Run this rule if to
- Click Save & Next.
- Add Workflow Actions on the Edit Rule – Escalate Low CSAT screen:
- In the actions area, open the Add Workflow Action (or Add Actions) dropdown and choose New Task.
- Set the Assigned To field to the Case Owner or a manager.
- Set Subject to something like
Follow up with customer — low CSAT score. - Set a Due Date (e.g.
Rule Trigger Date + 1 Day) and Status / Priority, then click Save.
After saving, you will see a Task record (e.g.Follow up with customer — low CSAT score) and, below it, a section Rules Using This Task showing theEscalate Low CSATrule with an Activate link. Important: This task will only be created if the rule is activated.
- To also send an internal notification email, go back to the same Add Workflow Action / Add Actions dropdown and choose New Email Alert:
- On the New Email Alert screen:
- Set Description to something like
Low CSAT Alert. - Set Object to
Case. - Choose an Email Template (for example, a simple internal alert template).
- Set Description to something like
- Decide who should receive the alert:
- For a fixed list of people, keep Recipient Type as
Userand move the right users from Available Recipients to Selected Recipients. - For a recipient based on the case context (for example, the case owner or account owner), choose an appropriate option from Recipient Type such as
Owner,Account Owner, orRole, then move the desired entry from Available Recipients to Selected Recipients.
- For a fixed list of people, keep Recipient Type as
- Optionally, use Additional Emails for shared mailboxes or distribution lists, and adjust From Email Address if needed.
- Click Save to return to the rule – the email alert will now appear in the list of actions for this rule.
- On the New Email Alert screen:
- Optionally, again use the Add Workflow Action / Add Actions dropdown and choose New Field Update:
- Create a field update that sets the checkbox field
Requires_Follow_Up__ctoTrueon the Case, then Save.
- Create a field update that sets the checkbox field
- When all required actions are added and visible in the actions list for this rule, click Done, then click Activate (or use the Activate link next to the rule name) to turn the rule on.
Supported Salesforce Field Types
Responsly enforces basic type compatibility when mapping survey questions to Salesforce fields. The table below summarizes common mappings:
| Salesforce Field Type | Compatible Responsly Question Types | Notes |
|---|---|---|
| Text / Textarea / String | All question types | Most versatile — recommended for custom fields |
| Number / Integer / Double | Number, Rating, NPS, CSAT, Slider | Sends the numeric score (e.g., 0–10 for NPS) |
| Boolean | Yes/No, Legal consent | true / false |
| Picklist | Single-select (Multiple choice, Dropdown) | Value must match a valid picklist option |
| Multi-picklist | Multi-select questions | Selected labels joined with ; |
| Date / DateTime | Date question | Converted to YYYY-MM-DD format |
| Reference | Hidden variables (IDs) | Used for linking records (e.g., contact_id, case_id) |
Tip: When creating custom fields in Salesforce specifically for survey data, use the Text data type — it accepts data from any question type without validation errors.
Architecture Summary
The complete post-support survey automation flow works as follows:
- A support agent (or automation) closes a Case in Salesforce Service Cloud.
- A Workflow Rule on the
Caseobject detects that the case is closed (for example,IsClosed = True) and its criteria are met. - Salesforce sends an Email Alert using the template containing the Responsly survey link, with merge tags dynamically populating the Contact’s email, ID, and Case ID.
- The customer receives the email, clicks or answers the embedded first question, and completes the survey on the Responsly landing page.
- Responsly maps the responses back to the Case and Contact records in Salesforce using the hidden variable identifiers.
- Updated fields (CSAT score, feedback text, NPS score) are immediately visible on the Salesforce record.
- Additional Workflow Rules or Flows in Salesforce trigger follow-up actions based on the response data (escalation, thank-you, task assignment).
Best Practices
- Keep surveys short: 1–3 questions for post-support surveys yield the highest completion rates.
- Time your delivery: Send the survey within minutes to a few hours of case closure while the experience is fresh.
- Monitor email limits: Salesforce enforces daily outbound email limits at the org level. High-volume support teams should monitor email alert consumption.
- Close the feedback loop: Act on negative feedback immediately with automated follow-up tasks or escalations. Customers who see action taken on their feedback report higher long-term satisfaction.
- Brand the survey: Customize the survey’s look and feel in Responsly to match your company’s branding for a seamless customer experience.
- Build Salesforce reports: Use the synced survey data to create dashboards tracking CSAT trends by agent, team, case category, or time period.